Why Wood Panels Are the Smart Choice for Stylish Walls

Walls do more than just hold up the ceiling—they help define the mood, style, and comfort of a space. Whether in a home, office, or commercial building, choosing the right wall finish can make a big difference. That’s where wood panels come in. Loved for their beauty and practical use, panels offer a creative and cost-effective way to bring any room to life.

In this article, we’ll explore how wood panels make spaces more beautiful, comfortable, and functional. You’ll also find answers to common questions and links to helpful resources if you’re ready to explore more.

Timeless Beauty with a Modern Touch

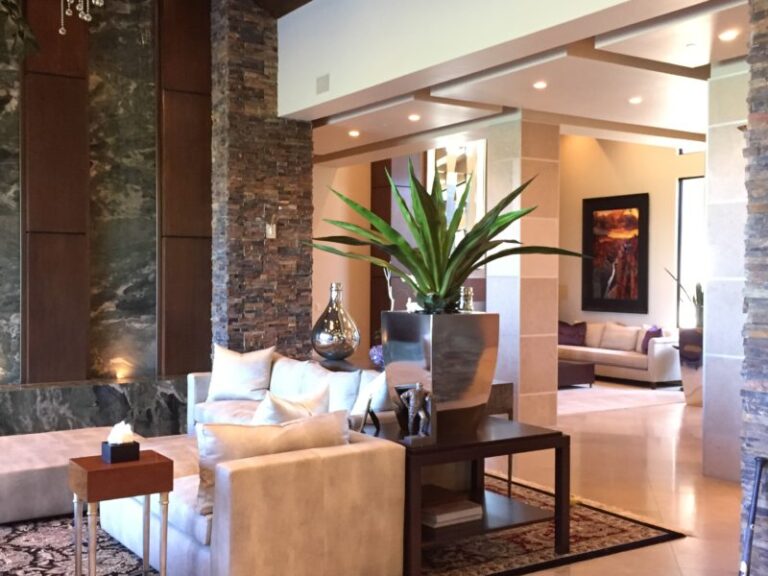
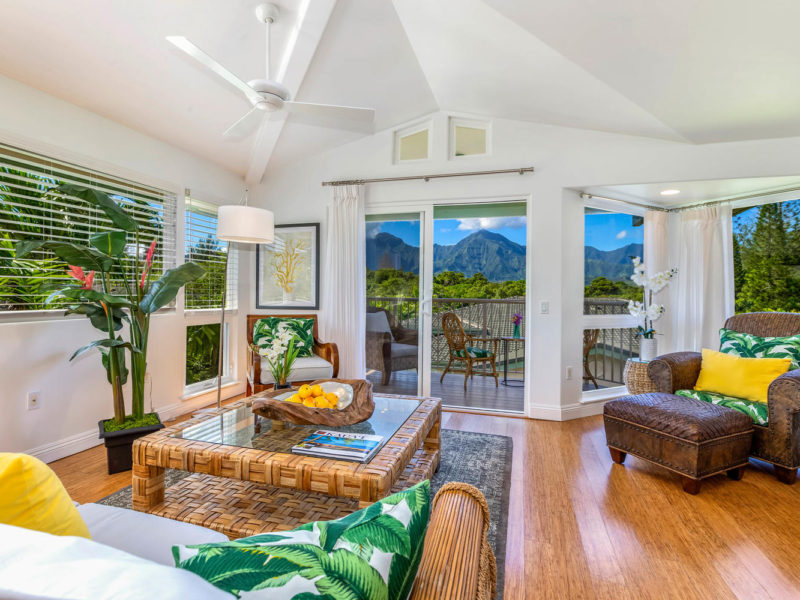
One of the primary reasons people choose panels is its ability to provide warmth and beauty to a place. Wood’s inherent patterns and textures provide a one-of-a-kind appearance that is difficult to match. Unlike plain paint or frigid tiles, wood panels instantly create a warm, inviting atmosphere.

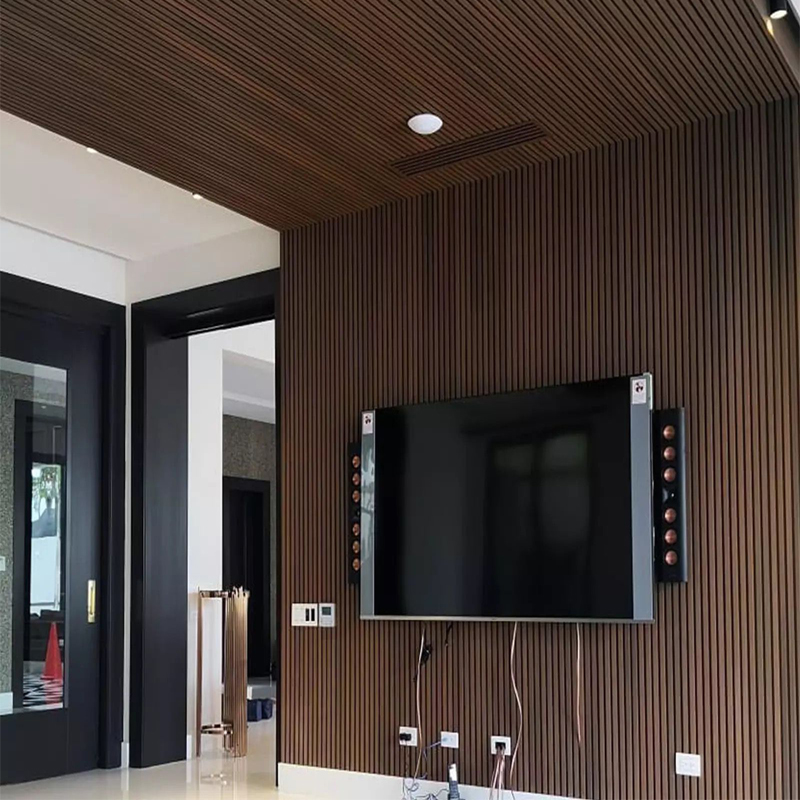
Easy to Fit in Any Style

Wood panels are incredibly flexible in design. You can use them in modern interiors with clean lines or in rustic spaces that need a natural touch. From dark walnut to light oak, there’s a wide range of colors and finishes that match nearly any decor style.

You can even choose natural oak acoustic slat wood wall panels to combine good looks with sound-absorbing function.

Looks Good for Years

Wood panels are made to last. With the right care, they can hold their beauty for many years. Some panels even age beautifully, adding character over time.

Sound and Warmth Benefits

Wood panels aren’t just about appearances—they also help with comfort. If you’re bothered by echo or outside noise, certain panels offer acoustic benefits too.

Helps Keep Rooms Quiet

Thanks to their density and natural materials, panels can absorb sound, making rooms feel more peaceful. This is especially useful in open spaces or homes with high ceilings. If you’re in Florida or similar regions, acoustic wood panels are a smart way to reduce noise while adding visual appeal.

Natural Insulation

Wood is a natural insulator. Adding panels to your walls can help keep a room warmer in winter and cooler in summer. This might even reduce your heating and cooling bills over time.

Quick Installation and Easy Upkeep

Another reason people choose wood panels is the ease of installing them. Unlike tile or drywall, many types of panels come in large sheets or slats that can be put up quickly—often with simple tools and little mess.

Low Maintenance, High Reward

Once installed, wood panels are pretty easy to take care of. Most just need dusting or a light wipe with a damp cloth to stay looking good. There’s no need to repaint or patch them like regular walls.

Eco-Friendly and Budget-Friendly

Today’s homeowners and designers want materials that are both stylish and sustainable. That’s another reason wood panels are so popular.

  • Sustainability: Many panels are made from recycled or responsibly sourced wood.
  • Longevity: Because they last a long time, you won’t need to replace them often.
  • Energy Savings: Their insulating quality means you might save money on utilities.

You can explore more smart and sustainable wall solutions for home and business spaces.

Common Types of Wood Panels

If you’re just starting to explore wall panels, here are some popular types to consider:

Type of Wood PanelDescription
ShiplapHorizontal panels that overlap slightly
Slat PanelsVertical narrow strips, often with soundproofing
Veneer PanelsThin wood surface bonded to another material
Reclaimed WoodEco-friendly panels with a rustic look
Acoustic PanelsDesigned to absorb sound and reduce echo

Each one offers something different. Your best choice will depend on the style you want and what your space needs most.

FAQs About Wood Panels

Q: Are wood panels good for humid areas like kitchens or bathrooms?
A: Yes, but make sure to choose panels made for moisture resistance, and seal them properly. Some types are specially treated for wet environments.

Q: Can I install wood panels by myself?
A: Many homeowners do, especially with peel-and-stick or click-lock styles. But for larger jobs or special designs, hiring a pro is a smart idea.

Q: How do wood panels help with sound?
A: They absorb and block sound waves, making spaces quieter. Acoustic versions are made to reduce noise even more effectively.

Q: What’s the best way to clean panels?
A: Just dust them often and use a damp cloth for smudges. Don’t use harsh cleaners or lots of water, as it can damage the finish.

Q: Where can I buy stylish, high-quality panels?
A: Great options include this acoustic panel store and the natural oak slat collection.


Final Thoughts
Wood panels do more than decorate—they help shape how a room looks, feels, and sounds. They’re easy to install, work in many spaces, and come in a wide variety of styles. Whether you’re fixing up a single wall or designing a new home, adding panels is a smart move that offers both beauty and benefits.

From Dust to Delight: Mastering Carpet Cleaning at Home

Carpet care is more than a routine chore—it protects your investment, improves indoor air quality, and keeps your living spaces welcoming. By understanding the principles of Carpet Cleaning and applying expert-backed strategies, you can maintain pristine carpets every day and restore their beauty with professional help when needed. Below is an in-depth guide—expanded to cover every essential step and tip—to help you achieve carpet perfection.


1. Establish a Regular Cleaning Routine

Why It Matters: Daily foot traffic grinds in dirt and allergens, accelerating wear and dulling colors over time. Consistent Carpet Cleaning preserves fiber integrity and appearance, while also helping reduce indoor allergens.

  • Vacuum Smartly
    • Frequency: At least once a week in low-traffic rooms; twice or more in busy hallways, play areas, and entryways.
    • Technique: Overlap each pass to avoid missing spots. Use crevice tools for edges, stairs, and upholstery.
    • Equipment: Select a vacuum with HEPA or high-efficiency filtration to trap fine particles rather than recirculating them back into the air.
  • Spot-Check Moisture
    • When using a steam cleaner or shampoo machine, monitor water output carefully. Over-saturation can lead to mold or mildew under the pile.
    • Dry Thoroughly: After cleaning, ventilate the room by opening windows or running fans. Consider a dehumidifier in humid climates to expedite drying.
  • Prevent Soil Entry
    • Entry Mats: Position washable mats both outside and inside every entrance to capture grit before it reaches your carpet.
    • Area Rugs: Use accent rugs in high-traffic corridors and under dining tables to protect primary carpeted areas.
    • No-Shoes Policy: Encourage family members and guests to remove shoes at the door; provide a shoe rack to make the habit easy.

2. Tackle Stains Immediately

Spills and accidents happen, but prompt action is key to preventing permanent marks. Incorporating targeted Carpet Cleaning techniques ensures you lift stains rather than grinding them deeper.

  1. Blot, Don’t Rub
    • Method: Firmly press a clean, white cloth or paper towel onto the spill. The white color prevents dye transfer.
    • Direction: Always work from the stain’s perimeter inward to contain and absorb the liquid without spreading.
  2. Homemade Solutions
    • Vinegar Spray: Mix equal parts white vinegar and water in a spray bottle. Lightly mist the area, allow it to penetrate for one minute, then blot dry.
    • Baking Soda Paste: Stir baking soda with just enough water to form a thick paste. Apply to the stain, let it sit 15–20 minutes to draw out oils and odors, then vacuum or blot away.
  3. Specialized Cleaners
    • For protein-based messes (pet accidents, blood), use an enzymatic cleaner that breaks down the organic compounds.
    • Patch Test: Always try any store-bought product on a small, inconspicuous area first to check for colorfastness.

3. Deep Clean Every 6–12 Months

Even the most diligent DIY efforts can’t remove embedded dirt and allergens buried deep in the pile. Scheduling professional Carpet Cleaning semiannually—or at least once a year—will revitalize fibers and improve hygiene.

  • Benefits of Professional Cleaning
    • Deep Extraction: High-powered equipment injects and extracts cleaning solutions, removing trapped debris and moisture beyond vacuum reach.
    • Sanitization: Hot-water steam or dry-extraction methods eliminate bacteria, mold spores, and dust mites, enhancing indoor air quality.
    • Fiber Restoration: Expert agitation lifts and fluffs matted carpet fibers, restoring softness and pile height.
  • Choosing a Service
    • Check Reputation: Read recent customer reviews on multiple platforms. Ask the company for before-and-after photos of previous jobs.
    • Eco-Friendly Options: Inquire about biodegradable, non-toxic detergents safe for children and pets.
    • Guarantee of Satisfaction: A reputable provider should offer a free touch-up if you’re not completely satisfied.

4. Maintain Freshness Between Cleans

Keeping carpets fresh between professional visits extends their beauty and delays the need for intensive treatments.

  • Odor Control with Baking Soda: Lightly sprinkle baking soda across the carpet. Let it sit for 15 minutes to absorb odors, then vacuum. This simple step enhances your routine Carpet Cleaning efforts.
  • Reapply Carpet Protector: A silicone-based spray creates a protective barrier against spills and soils. Reapply every 3–6 months to maintain optimal defense.
  • Rotate Rugs & Furniture: Moving accent rugs and rearranging furniture every few months prevents uneven wear patterns and prolongs the life of underlying carpet fibers.

5. Special Strategies for Homes with Pets & Kids

Pets and children bring laughter—and occasional messes. Tailor your approach to stay ahead of accidents and preserve a hygienic environment.

  • Pet Hair Removal: Use a rubber-bristle broom, specialized vacuum attachment, or even a lint roller for quick hair pickup before vacuuming.
  • Accident Cleanup:
    1. Blot fresh moisture with an absorbent cloth.
    2. Apply an enzyme-based cleaner designed for pet stains.
    3. Rinse lightly with water, then blot dry thoroughly.
  • Kid-Friendly Zones: • Lay down washable play mats or low-pile rugs in snack and activity areas. • Keep stain-removal wipes or pens within easy reach for instant spot treatment.

FAQ

  • How often should I vacuum? At a minimum once weekly; increase to twice or more in entryways, playrooms, and pet zones for optimal upkeep.
  • Will DIY methods replace professional cleaning? DIY techniques keep carpets looking good day to day, but a professional Carpet Cleaning every 6–12 months is essential for deep sanitization and fiber restoration.
  • Can I use store-bought cleaners? Yes—but always spot-test first and follow label instructions to avoid discoloration or fiber damage.
  • How do I prevent mold after cleaning? Ensure carpets are completely dry within 12–24 hours: open windows, run fans, or use a dehumidifier.

By combining vigilant daily care with periodic professional interventions, your carpets will remain vibrant, fresh, and long-lasting, ready to welcome family and guests every day. Implement these strategic expert strategies to transform “dust” into “delight” and make carpet cleaning a breeze rather than a burden.

Why Chimney Cleaning Is More Than Just a Chore: The Hidden Benefits You Need to Know

The Warmth You Love, the Risks You Overlook

Lighting a fire in your fireplace should bring warmth and joy, not worry. But without regular attention, your chimney can become a silent hazard hiding above your head. The chimney isn’t just a vent for smoke—it’s a complex system that, when left uncleaned, can threaten your home and health. Discover the top chimney cleaning benefits and why this often-overlooked task should be on every homeowner’s to-do list.

The Top Chimney Cleaning Benefits You Can’t Ignore

Fire Prevention: Stop the Blaze Before It Starts

One of the most important chimney cleaning benefits is fire prevention. Burning wood releases creosote, a sticky, flammable substance that clings to your chimney walls. Left unchecked, creosote buildup can ignite with high heat, leading to a chimney fire.

  • Creosote can ignite at just 451 degrees Fahrenheit.
  • Chimney fires can quickly spread to your attic and roof.
  • Even small chimney fires can damage the lining, increasing risk of future fires.

Clear Air, Clear Conscience: Prevent Carbon Monoxide Poisoning

Another essential chimney cleaning benefit is improved indoor air quality. A blocked chimney can trap carbon monoxide inside your home. This colorless, odorless gas is deadly and can build up quickly if ventilation is restricted.

  • Headaches and dizziness are early symptoms.
  • Pets and children are especially vulnerable.
  • Annual inspections reduce this life-threatening risk.

Boost Efficiency: Get More Heat with Less Fuel

A clean chimney allows better airflow, making your fireplace or wood stove more efficient. If the air can’t flow smoothly, your fire struggles to burn cleanly. Chimney cleaning benefits include:

  • Stronger, steadier flames.
  • Less smoke and ash.
  • Reduced energy waste and lower heating costs.

How Often Should You Clean Your Chimney?

Even occasional fireplace use calls for regular attention. The National Fire Protection Association (NFPA) recommends annual chimney inspections. More frequent cleaning may be necessary depending on your usage habits.

Guidelines Based on Usage:

  • Frequent use (daily or weekly in winter): Clean at least once a year, ideally before the season starts.
  • Occasional use (a few times per season): Inspect yearly, clean every 2–3 years.
  • Gas fireplaces: While cleaner than wood-burning systems, still require inspections to check for obstructions or structural wear.

Bonus Chimney Cleaning Benefits for Homeowners

Maintain Property Value

A well-maintained chimney can preserve and even enhance your home’s value. Potential buyers often look for functioning, safe fireplaces.

Protect Interior Surfaces

Soot and smoke damage from poor ventilation can stain walls, ceilings, and furniture. Regular chimney cleaning keeps your interiors clean and fresh.

Detect Structural Issues Early

Annual inspections help spot cracks, broken flue tiles, and deteriorating mortar before repairs become expensive. Early detection is one of the long-term chimney cleaning benefits that can save thousands.

Chimney Cleaning Checklist: What Professionals Look For

When you schedule a professional chimney sweep, they typically inspect and clean the following:

  • Chimney flue and liner
  • Firebox and damper
  • Chimney cap and crown
  • Creosote buildup levels
  • Blockages or nests (especially birds or rodents)

Most Overlooked Chimney Cleaning Benefits

Allergy Reduction

A blocked or dirty chimney can harbor mold, dust, and dander, circulating irritants into your living space. One of the lesser-known chimney cleaning benefits is improved respiratory health.

Insurance Compliance

Some homeowners’ insurance policies require regular chimney maintenance. Keeping cleaning records can help support insurance claims or reduce premiums.

Peace of Mind

Knowing your chimney is clean and safe gives you confidence when lighting your next fire. This peace of mind is a benefit you can’t put a price on.

Frequently Asked Questions (FAQ)

How do I know if my chimney needs cleaning?

Look for signs like a strong smoky smell, slow-burning fires, black soot marks around the fireplace, or visible creosote buildup.

Can I clean my chimney myself?

While DIY kits exist, professional cleaning is recommended. Certified sweeps have the tools and expertise to do a thorough job and inspect for damage.

What happens if I don’t clean my chimney?

Neglecting your chimney can lead to chimney fires, carbon monoxide exposure, poor heating efficiency, and expensive structural damage.

How much does professional chimney cleaning cost?

Most services cost between \$100–\$300, depending on your location and chimney condition. It’s a small price to pay for the long list of chimney cleaning benefits.

Do gas fireplaces need chimney cleaning?

Yes, though they produce less residue, they still require regular inspections to ensure the venting system is clear and safe.

Final Thoughts: Don’t Skip This Critical Home Task

From preventing fires to protecting your family’s health, the chimney cleaning benefits far outweigh the cost or effort. Regular maintenance extends your chimney’s life, boosts efficiency, and keeps your home safe and warm. Make it a yearly ritual, and enjoy your fireplace with total peace of mind. Learn more…

How Often Should You Clean Your Chimney? A Modern Guide to Fire Safety

A cozy fire brings comfort and charm to your home, but behind the glow, your chimney is hard at work filtering out smoke, gases, and soot. Over time, this process causes a buildup of dangerous byproducts like creosote that, if left unattended, could ignite and cause serious damage. Regular chimney cleaning isn’t just smart—it’s essential for protecting your family and your property.

Why Chimney Cleaning Matters

Every fire you burn releases particles that travel up the chimney and cool along the way. These particles form creosote, a thick, tar-like substance known for being highly flammable. When creosote builds up in large amounts, it can catch fire—leading to chimney fires that can exceed 2,000°F and spread to the rest of your home.

Besides fire hazards, a dirty chimney can become a clogged chimney. Leaves, soot, or even nesting animals can block the flue, preventing smoke and toxic gases like carbon monoxide from properly venting. This can result in backdrafts or poor air quality in your home.

That’s why it’s critical to schedule routine chimney cleaning with a trusted provider like Local Chimney Sweep Cleaning, especially if you rely on your fireplace during colder months.

How Often Should You Clean Your Chimney?

According to safety experts, your chimney should be inspected at least once a year and cleaned whenever needed. If you’re burning wood frequently, cleaning may be required more than once annually.

Key Factors That Affect Cleaning Frequency

  • How often you use your fireplace: Daily or weekly use throughout winter means faster creosote buildup.
  • Type of wood you burn: Softwoods and unseasoned wood produce more smoke and residue, which accelerates buildup.
  • Fuel source: Wood-burning systems require more frequent cleaning than gas or oil-burning units, though all should be inspected annually.

Warning Signs You Shouldn’t Ignore

  • Smoky smells even when your fireplace isn’t in use
  • Difficulty lighting or maintaining fires
  • Excess soot falling into your fireplace
  • Scratching or chirping sounds—signs of animal nesting
  • A thick, shiny residue visible inside the flue

If you notice any of these symptoms, don’t wait—schedule a chimney cleaning near you in West Hollywood.

Should You DIY or Call a Pro?

DIY chimney sweep kits might help with basic maintenance, but they often miss hidden hazards. A professional inspection includes a complete check of the chimney’s interior and exterior, from creosote levels to masonry cracks and animal blockages.

Working with certified chimney experts ensures a safer, more thorough job. For professional-grade service, Local Chimney Sweep Cleaning offers experienced teams who know how to keep your system safe and functional.

More Than Just Safety—It’s About Efficiency

Clean chimneys don’t just prevent fires—they improve the efficiency of your heating system. When your flue is clear, smoke and combustion gases exit more quickly, allowing your fire to burn hotter and cleaner. This means more heat with less fuel and fewer air quality issues indoors.

Regular chimney maintenance is a small investment that pays off big in home comfort, energy efficiency, and peace of mind.


Boost Your Visibility Online
If you’re a chimney service provider or home maintenance professional looking to attract local clients, Worldigital can help. Their custom digital marketing solutions are designed to elevate your brand and connect with more homeowners.

Chimney Maintenance 101: Chimney Fire Prevention Tips

A crackling fire can turn any winter evening into a cozy retreat. Yet, behind the charm of a fireplace lies a potential danger that many homeowners overlook—chimney fires. Without proper care, your chimney can become a silent threat, harboring flammable materials that could ignite at any moment. The good news? With the right maintenance, you can significantly reduce these risks and enjoy your fireplace worry-free. This guide will walk you through chimney fire prevention tips to keep your home safe and your fireplace operating efficiently.


Why Chimney Maintenance Is Crucial

Your chimney plays a vital role in venting smoke and gases safely out of your home. Over time, however, soot and a highly combustible substance called creosote can build up along the inner walls. This buildup is the leading cause of chimney fires, according to the National Fire Protection Association. Because a neglected chimney doesn’t just risk a fire—it can lead to poor indoor air quality, carbon monoxide exposure, and costly structural damage. That’s why understanding and applying chimney fire prevention tips is key to a safer home.


Essential Chimney Maintenance Practices

Annual Inspections Are a Must

Experts recommend scheduling a professional inspection at least once a year. A certified technician will assess the integrity of your chimney, look for blockages or damage, and measure creosote levels. This is your first line of defense in preventing a fire hazard.

Don’t Skip Regular Cleaning

How often you should clean your chimney depends on how frequently you use it. Frequent fireplace users may need cleanings multiple times per year. Regular cleanings remove soot, creosote, and any nesting materials or debris that may have entered from above.

For comprehensive and safe service, consider reaching out to a trusted chimney cleaning provider who has the right tools and expertise to do the job thoroughly.

Burn the Right Kind of Wood

The type of firewood you use directly impacts the cleanliness of your chimney. Seasoned hardwoods like oak and hickory burn hotter and produce less creosote compared to unseasoned or softwoods like pine. Avoid burning painted or treated wood, cardboard, or trash, all of which release harmful chemicals and leave behind excessive residue.

Install a Chimney Cap

A chimney cap serves several protective functions. It keeps rain, animals, and debris out, and it helps prevent downdrafts. Moisture can damage both the chimney and the surrounding masonry, so having a well-fitted cap can extend the life of your chimney and protect your home from hidden damage.

Stay Alert to Warning Signs

Pay attention to strange smells, smoke backing into your home, or unfamiliar noises when the fireplace is in use. These can indicate creosote buildup, animal nests, or other issues that demand immediate professional attention.

If you’re experiencing these warning signs, a qualified sweep technician can quickly diagnose and address the problem before it escalates.


Additional Chimney Fire Prevention Tips

Install Essential Detectors

Smoke detectors and carbon monoxide alarms should be installed near the fireplace and in bedrooms. Test them monthly and replace the batteries at least twice a year. Carbon monoxide is invisible and odorless but can be deadly, making these alarms vital for any home with a fireplace.

Maintain Safe Distances

Keep flammable materials—like furniture, rugs, and holiday decorations—at least three feet away from the hearth. Always use a fire screen or glass doors to prevent embers from escaping into the room.

Educate Everyone in the Household

Make sure all household members understand basic fireplace safety: how to operate the damper, start a safe fire, and what to do in case of an emergency. Establish a fire escape plan and practice it periodically.


When to Call a Professional

After learning about chimney fire prevention tips, you will learn about signs that needs expert attention. Here’s when to reach out to a pro:

  • Difficulty starting or maintaining a fire
  • Persistent smoky odor
  • Black, flaky substance (creosote) visible inside the flue
  • Cracks in the chimney structure
  • Following severe weather events or earthquakes

Don’t wait for a small issue to become a disaster. Reach out to experienced professionals who can ensure everything is functioning safely and efficiently.


Frequently Asked Questions (FAQs)

How often should I have my chimney cleaned?
It’s recommended to clean your chimney at least once a year. If you use your fireplace frequently, consider multiple cleanings throughout the heating season.

Can I clean the chimney myself?
While it’s possible to do light maintenance like ash removal, a full cleaning and inspection should be left to professionals who have the proper equipment and experience.

What is creosote, and why is it dangerous?
Creosote is a flammable byproduct of burning wood. It builds up inside chimneys and is the number one cause of chimney fires.

What kind of wood should I burn in my fireplace?
Use seasoned hardwoods such as oak or maple. These woods burn more efficiently and produce less creosote compared to soft or green wood.

Do gas fireplaces need maintenance too?
Absolutely. Gas fireplaces still require vent inspection, cleaning, and checks for blockages or damage to ensure they operate safely.


Keep It Clean, Keep It Safe

Proper chimney maintenance isn’t just about cleanliness—it’s about peace of mind. With routine inspections, the right firewood, and attention to warning signs, you can protect your home and family from avoidable hazards.

For reliable help, trust a certified expert to keep your chimney in top condition. And if you’re looking for smarter ways to manage home maintenance digitally, explore solutions from this platform to streamline your upkeep routines.

How Often Should You Clean Your Chimney?

When the cold season rolls in and your fireplace becomes the heart of your home, there’s nothing more comforting than a warm, crackling fire. But beneath the beauty and warmth lies a responsibility many homeowners overlook—chimney maintenance. So let’s tackle the big question: how often should you clean your chimney?


Section 1: The Hidden Danger Inside Your Chimney

Imagine this: a calm winter night, your fireplace lit, the family gathered. Then, a strange burning smell. Minutes later, your smoke alarm screams. You run outside and see smoke billowing from your roof. That’s not a faulty log—it’s a chimney fire, and it happens more often than most realize.

What’s Really Happening in Your Chimney?

Every fire you light leaves behind soot, ash, and creosote—a sticky, highly flammable byproduct of burning wood. Over time, this gunk accumulates on the walls of your chimney and, if ignored, becomes a serious fire hazard.

Signs Your Chimney Needs Cleaning:

  • A campfire smell indoors when the fireplace isn’t in use.
  • Smoke entering your room even when the damper is open.
  • Black soot flakes in the firebox or on the hearth.
  • Difficulty starting or maintaining fires.
  • Oil or tar-like streaks inside the chimney flue.

How Often Do You Really Need to Clean Your Chimney?

Here’s the general rule: clean your chimney at least once a year. But let’s break it down by usage type and fuel source:

Fireplace Usage LevelCleaning Frequency
Occasional (1–5 times/year)Every 2 years
Moderate (weekly during winter)Annually
Heavy (daily in cold months)Every 6 months
Wood stove or insertEvery 3 months or per cord burned
Gas fireplaceEvery 1–2 years (inspection only)

And don’t assume gas fireplaces are exempt. Birds, nests, and blockages can still disrupt ventilation, leading to dangerous carbon monoxide exposure.

Why It’s About More Than Just Fire

Failing to clean your chimney doesn’t just risk a house fire. It can lead to:

  • Toxic air leaks: Carbon monoxide from improper venting.
  • Structural damage: Creosote and moisture cause chimney decay.
  • Expensive repairs: Cracks, deterioration, and mold buildup.
  • Smoke damage: Stained walls, ceilings, and upholstery.

One neglected winter can cost you thousands.

If you’re in California and want to eliminate the guesswork, professional services like this trusted chimney cleaning team in Malibu make it easy, safe, and stress-free.


Section 2: Professional vs. DIY Chimney Cleaning – What You Need to Know

Let’s say you’re a hands-on homeowner. You love a good DIY challenge. Cleaning your chimney might sound like something you can handle on your own. But before you grab a brush and climb onto the roof, consider what’s actually involved—and what could go wrong.

What’s Involved in a Full Chimney Cleaning?

A professional chimney cleaning goes beyond simple sweeping. Here’s what a certified technician will do:

Step-by-Step Professional Cleaning Process:

  1. Initial Inspection: Look for blockages, damage, or creosote glaze.
  2. Protect Home Interior: Drop cloths and vacuums prevent soot damage.
  3. Brushing and Sweeping: Specialized brushes clear the flue and smoke chamber.
  4. Creosote Removal: Manual and mechanical tools tackle stubborn buildup.
  5. Structural Check: Examine masonry, liners, and chimney cap.
  6. Photo or Video Report: Clients see before-and-after results.

This comprehensive approach ensures not just cleanliness, but safety and structural integrity. And they know where to look for hidden trouble spots.

DIY Cleaning: Worth the Risk?

If you’re considering doing it yourself, here’s what you’ll need:

Essential Tools:

  • Chimney brush (sized to your flue)
  • Flexible extension rods
  • Protective clothing and goggles
  • Industrial vacuum or HEPA filter
  • Ladder and roof harness
  • Flashlight and inspection mirror

DIY Drawbacks:

  • You may miss dangerous buildup.
  • Chimney liners can be accidentally damaged.
  • Climbing on the roof is risky.
  • You may not spot hidden structural issues.

Plus, insurance companies may not honor claims if damage results from improper cleaning. In most cases, hiring a pro is not only safer—it’s cheaper in the long run.

For a trustworthy, certified team across the state, check out these highly rated chimney pros ready to inspect and clean before your next cozy fire.

How Much Does Chimney Cleaning Cost?

Let’s talk about money. Here’s what you can typically expect:

Service TypePrice Range
Basic sweep\$100 – \$250
Sweep + Inspection\$150 – \$300
Chimney camera scan\$200 – \$400
Wildlife removal\$100 – \$300
Structural repair\$300+

Compared to the cost of a fire-related home repair (\$10,000+), regular cleaning is an affordable investment.


Section 3: Smart Habits, Scheduling Tips, and Real-Life Lessons

Now that you know the risks, benefits, and costs, let’s dive into how to make chimney cleaning a natural part of your home care routine. It starts with awareness and ends with action.

The Best Times of Year to Clean Your Chimney

Plan around the seasons to avoid delays:

[SPRING]: Best for repairs & full cleaning after heavy use.

[SUMMER]: Ideal time to schedule before the fall rush.

[FALL]: Busiest season—book early!

[WINTER]: Emergency cleaning only; tougher to book.

Pro tip: Spring cleaning helps remove acidic soot and prevents off-season corrosion.

Tips to Keep Your Chimney Cleaner, Longer

The more efficient your fires, the slower creosote builds up. Follow these guidelines:

  • Burn only seasoned hardwoods like oak, birch, or maple.
  • Avoid unseasoned wood or moisture-rich logs—they cause faster buildup.
  • Keep fires hot and bright, not slow and smoldering.
  • Use a chimney cap to block debris, birds, and rain.
  • Open your damper fully during use to maintain strong airflow.
  • Install a spark screen for added protection from flying embers.

What Happens If You Don’t Clean It?

Let’s take a look at Tom, a homeowner who learned the hard way.

Tom used his fireplace all winter but skipped cleaning. In December, he noticed a bitter, smoky odor. A small fire broke out in the flue. Luckily, firefighters saved the house—but the damage cost him over \$18,000.

“I had no idea just how dangerous it was,” he shared. “I’ll never skip another cleaning again.”


Chimney Cleaning for Different Fireplace Types

Fireplace TypeCleaning NeedsNotes
Traditional (wood)1–2x per year depending on usageHighest creosote output
Wood stoveEvery 3–4 monthsHigh-efficiency heat, fast buildup
Gas fireplaceEvery 1–2 years (inspection critical)Venting and blockages must be clear
Pellet stoveMonthly cleaning plus yearly inspectionPellets burn clean but dust builds
Masonry chimneyYearly inspection & cleaningVulnerable to cracks, wear

Each system behaves differently. Understanding your setup helps you stay ahead of problems.


Bonus: Chimney Fire Prevention Checklist

Use this quick checklist to ensure your fireplace is ready:

  • Had my chimney cleaned this year
  • Burn only dry, seasoned hardwood
  • Installed a chimney cap
  • Inspected my damper and flue
  • Scheduled a post-winter inspection
  • Checked for draft problems or odors
  • Verified service company is CSIA-certified

Final Thoughts: Clean Your Chimney—Stay Safe, Stay Warm

Your fireplace isn’t just a cozy feature—it’s a potential hazard if not maintained. Whether you’re lighting it once a year or every night during the cold season, it deserves attention.

Clean your chimney once a year, minimum. More if you’re a frequent fire-starter.

Chimney maintenance may not be glamorous, but it’s one of the simplest ways to protect your home, health, and comfort. Don’t wait for a disaster. Act now, stay safe, and enjoy your fire the way it’s meant to be—worry-free.

For top-rated services that bring peace of mind with every visit, click here to book a local chimney sweep.

Explore our full range of services.


🔥 Frequently Asked Questions (FAQs)

1. How do I know when it’s time to clean my chimney?

If you notice smoke backing into the room, a strong campfire-like odor, or black soot around the fireplace, it’s likely time for a cleaning. Even if you don’t notice visible signs, it’s best to have your chimney cleaned or inspected at least once a year to prevent hidden dangers like creosote buildup or blockages.


2. Can I clean my chimney myself, or should I hire a professional?

You can technically clean your chimney yourself, but it’s not recommended unless you have the proper tools, safety equipment, and experience. Professionals have the training to spot hazards, use specialized tools, and ensure everything is thoroughly cleaned—reducing your risk of fire or ventilation problems.


3. What happens if I don’t clean my chimney regularly?

Skipping regular chimney cleaning can lead to a buildup of creosote, which is extremely flammable. This increases your risk of chimney fires, carbon monoxide poisoning, smoke damage, and costly repairs due to structural damage. It’s a health and safety risk not worth taking.


4. How much does professional chimney cleaning typically cost?

Chimney cleaning typically costs between $100 to $300, depending on your location, chimney type, and the level of buildup. It may be more if you require inspections, camera scans, or animal nest removal. Compared to the potential cost of fire damage, it’s a wise investment in home safety.


5. What’s the best time of year to schedule chimney cleaning?

The best time to schedule your chimney cleaning is in late spring or summer—right after the burning season and before the fall rush. This ensures your fireplace is ready for use when cold weather hits and gives you plenty of time for repairs if needed.

DIY Chimney Cleaning: Is It Safe and Effective?

The Allure of DIY Chimney Cleaning: What’s Behind the Craze?

It’s a frosty evening. The fireplace is roaring, casting warm shadows across the living room walls. There’s hot cocoa on the table and fuzzy socks on your feet. Everything feels just right—until a swirl of smoke pours back into the room, turning that cozy night into a smoky mess.

That’s the moment many homeowners realize just how important chimney maintenance really is.

But then comes the second realization: chimney cleaning can be expensive. So, you hop online, watch a few tutorials, and start wondering, “Can I really clean my chimney myself?” If you’ve thought this, you’re not alone.

Why DIY Chimney Cleaning Is So Tempting

There’s something empowering about fixing things on your own. No appointments. No waiting. No invoice. Just you, your tools, and a sense of accomplishment. That’s the heart of the DIY chimney cleaning movement.

Let’s break down why so many homeowners consider this route:

  • It feels more cost-effective. Paying $150–$350 a year for chimney sweeping adds up.
  • Tools are widely available. Online retailers and hardware stores now stock entire DIY chimney cleaning kits.
  • There’s a do-it-yourself culture boom. YouTube has made “learning by watching” more accessible than ever.
  • It gives homeowners control. With everyone juggling busy schedules, being able to handle the task at one’s own pace is appealing.

Still, DIY isn’t always the shortcut it seems to be.

The Hidden Complexity of Chimney Systems

Most people picture their chimney as a simple brick tube. In reality, modern chimneys have multiple components:

  • Flue liner (metal or clay): directs smoke and gases safely upward.
  • Smoke chamber: funnels smoke into the flue.
  • Damper: opens and closes to control airflow.
  • Crown and cap: keep out rain, animals, and debris.

If any of these elements are damaged or blocked, it can lead to poor draft, smoke backups, and worst-case scenario—chimney fires. Creosote, a tar-like substance created when wood burns, is particularly dangerous. It sticks to the walls of the flue and builds up over time.

Creosote has three stages:

StageTextureDanger LevelDIY Removable?
1Flaky or dustyLowYes
2Crunchy & tar-likeMediumSometimes
3Glazed, hard, glossyHighNo (needs pro)

Many homeowners unknowingly leave behind stage 2 or 3 creosote, increasing fire risk significantly.


Getting Your Hands Dirty: What DIY Chimney Cleaning Involves

So, you’ve decided to give DIY chimney cleaning a go. You’ve watched a couple of videos and feel fairly confident. But before you jump on the roof, let’s walk through what this really involves—and whether it’s something you’re truly ready for.

Step-by-Step DIY Chimney Cleaning Process

This process isn’t a one-size-fits-all solution, but here’s a comprehensive outline of how most DIY cleanings go:

Step 1: Safety Comes First
  • Put on safety goggles, thick gloves, and a dust mask or respirator.
  • Ensure your ladder is stable. Roof work is dangerous, especially on wet or icy days.
  • If possible, have someone spot you from the ground.
Step 2: Prepare Your Home
  • Use drop cloths or old blankets to cover flooring and furniture.
  • Close nearby doors to keep soot from spreading.
  • Turn off fans, HVAC, and pilot lights before beginning.
Step 3: Inspect Your Chimney

Use a flashlight or camera on a rod to examine the interior for:

  • Creosote buildup
  • Soot
  • Animal nests
  • Broken bricks or flue tiles
  • Moisture or rust stains
Step 4: Choose Your Cleaning Method

There are two main approaches:

  • Top-down cleaning: Requires accessing the chimney from the roof and working your brush downward.
  • Bottom-up cleaning: Lets you clean from inside the home but can be messier.

Both require:

  • Chimney brush (correct size for your flue)
  • Rod extensions (to reach entire flue length)
  • A vacuum (HEPA preferred) to manage soot fallout
Step 5: Start Scrubbing

Push and pull the brush several times, working your way through the length of the chimney. The goal is to dislodge as much creosote and soot as possible. Expect black flakes, dust clouds, and a good upper-body workout.

Step 6: Clean the Firebox and Damper

Once the chimney interior is brushed, sweep or vacuum the soot from your fireplace’s base. Don’t forget to check and clean the damper—it often collects creosote too.

Step 7: Re-inspect and Dispose

Use your flashlight again to verify your work. Bag the debris in heavy-duty trash bags and dispose of it safely, following local regulations.


Tools of the Trade: DIY vs. Professional Equipment

ToolDIY Option Available?Pro-Level Advantage
Chimney Brush✅ YesIndustrial strength and custom-fitted to chimney
Extension Rods✅ YesFlexible, longer reach
Drop Cloths✅ YesFire-rated protection
Vacuum (HEPA preferred)✅ Shop vac usableDustless commercial suction systems
Camera Inspection Gear❌ Not typicalDetects cracks, leaks, damage in hard-to-see areas

Pros use advanced gear because they’re not just cleaning—they’re inspecting your chimney’s health.

DIY Pitfalls to Avoid

  • Wrong brush size: Too small = ineffective. Too big = liner damage.
  • Skipping inspections: Just because it’s clean doesn’t mean it’s safe.
  • Ignoring odors: A burnt or musty smell may indicate hidden creosote or moisture damage.
  • Animal nests: Raccoons and birds often nest in chimneys. DIYers risk bites, diseases, or worse.

When DIY Isn’t Enough: The Case for Professional Chimney Sweeping

Let’s be honest: some homeowners are capable of performing a decent chimney cleaning. But even with the best tools and intentions, you can’t always see or solve the underlying issues.

Real-World Story: The Tale of Two Neighbors

  • Mike, a proud DIYer, bought a chimney kit and spent his Saturday brushing away soot. Three weeks later, he noticed smoke backing up into his living room. A pro revealed a cracked flue liner that Mike had missed—and a critter nest behind his damper.
  • Sandra, on the other hand, scheduled a cleaning through this trusted local provider. Not only did they remove creosote, but they also repaired minor flashing issues around the chimney crown—saving her from future water leaks.

Which story would you rather tell?

Signs It’s Time to Call in the Pros

Here’s how to know when it’s smarter to leave it to professionals:

  • You notice poor drafting (smoke leaks into the room).
  • You haven’t had an inspection in over a year.
  • Your chimney smells—even when unused.
  • You see visible staining, soot marks, or cracks.
  • Your fires burn sluggishly or fail to stay lit.

If this sounds familiar, book an expert cleaning today with a team trusted in Venice.

Value of Professional Services

Professionals offer more than soot removal. They provide:

  • Detailed camera inspections
  • Flue cap and damper assessments
  • Creosote stage evaluations
  • Repair recommendations
  • Code compliance checks

In essence, they’re your chimney’s doctor—spotting the illnesses before they turn into disasters.

The Hybrid Approach: Best of Both Worlds

If you’re still committed to DIY chimney cleaning, consider this compromise:

  • Do a light sweep mid-season after heavy use.
  • Schedule a professional inspection every year, ideally before winter.
  • Keep a chimney journal noting dates of cleaning, type of wood burned, and any issues noticed.

This approach balances self-sufficiency with the reassurance of expert oversight.


Final Thoughts: Playing It Smart With Your Chimney

DIY chimney cleaning isn’t inherently bad—it can be a helpful, hands-on way to maintain your home. But it’s not a complete replacement for professional inspection and care. When safety, fire risk, and long-term home value are at stake, “good enough” isn’t good enough.

Whether you choose to grab a brush yourself or call in the experts, make sure your chimney gets the attention it deserves. Because when that next cozy fire night rolls around, the last thing you want is smoke signals telling you something’s wrong.For peace of mind, trusted service, and expert chimney care, schedule your cleaning now with Local Chimney Sweep Cleaning.

To see our portfolio and latest work, check out.

🔥 Frequently Asked Questions About DIY Chimney Cleaning

1. Can I really clean my chimney myself, or should I always hire a professional?
You can clean your chimney yourself using the right tools and safety precautions—especially for minor soot buildup. However, for creosote removal, hidden damage, or annual inspections, it’s much safer and more effective to hire a certified professional. Most experts recommend a hybrid approach: DIY touch-ups plus yearly professional service.


2. How do I know if my chimney actually needs cleaning?
You might need a cleaning if:

  • Smoke backs up when using the fireplace
  • There’s a strong smoky or musty odor, even when unused
  • Fires burn poorly or go out quickly
  • You see black soot around the fireplace opening

If it’s been over a year since your last inspection, it’s time to act—dirty chimneys are a leading cause of house fires.


3. What happens if I miss a spot or don’t clean the chimney properly?
Missed creosote buildup—especially Stage 2 or Stage 3—can cause dangerous chimney fires. It can also lead to smoke damage, carbon monoxide exposure, and reduced fireplace efficiency. Even if your chimney looks clean, unseen issues like cracks, blockages, or animal nests can go undetected without a professional eye.


4. What equipment do I need for safe and effective DIY chimney cleaning?
At minimum, you’ll need:

  • A chimney brush sized to your flue
  • Extension rods
  • Safety goggles, gloves, and a dust mask
  • A sturdy ladder (for roof access)
  • Drop cloths and a vacuum (preferably HEPA)

For major creosote or hard-to-reach areas, you’ll need specialized tools that pros typically use.


5. How often should I clean my chimney if I use my fireplace regularly?
If you use your fireplace frequently during colder months, aim to clean it at least once a year. Light users can stretch that to every 1–2 years, but an annual inspection is still highly recommended. For high-use households, a mid-season DIY sweep plus a fall professional cleaning is the ideal combo.

What Does a Chimney Cleaning Service Include?

It’s a cool winter evening, and your fireplace is flickering with warmth. But have you ever stopped to wonder what’s going on above the flames — inside your chimney? If you’re like most homeowners, it’s probably not something you think about often. But here’s the truth: a dirty chimney can be a silent hazard.

That’s where a chimney cleaning service comes in. This isn’t just about sweeping away some ashes; it’s a full process designed to keep your home safe, your fireplace efficient, and your air clean. Whether you’re a new homeowner or just catching up on overdue maintenance, this guide will walk you through everything a proper service should include — no fluff, just real-world answers and expert-backed insights.


Section 1: The Purpose and Process of Chimney Cleaning — What Really Happens During a Service?

Let’s start at the beginning. When someone books a chimney cleaning service, what exactly are they getting? Many people imagine a quick sweep with a broom. But a proper, professional chimney cleaning is much more comprehensive than that.

Why Chimney Cleaning Matters

Think of your chimney like the lungs of your fireplace. If it’s clogged, nothing flows properly. Over time, burning wood creates soot and creosote, which stick to the inner walls of your chimney. These materials are not just dirty—they’re flammable. When creosote builds up, it can ignite and cause a chimney fire, one of the leading causes of house fires in homes with fireplaces.

Key Risks of Skipping Regular Cleanings:

  • Creosote buildup → Chimney fires
  • Clogged flues → Carbon monoxide backflow
  • Moisture accumulation → Brick and mortar damage
  • Animal nests → Blockages and odor
  • Poor draft → Smoky indoor air

So, the main goal of a chimney cleaning service is not just cleanliness, but safety and performance.

The Initial Inspection (Where It All Begins)

Every good chimney cleaning begins with a thorough inspection. This helps the technician determine what your chimney needs and how to approach the cleaning.

Common Inspection Points Include:

  • Chimney cap and crown condition
  • Brick and mortar wear or cracks
  • Smoke shelf and smoke chamber
  • Flue liner and damper functionality
  • Firebox integrity
  • Creosote thickness

Depending on the provider and the chimney’s condition, inspections may be visual (Level 1), accessible with tools (Level 2), or invasive (Level 3, usually post-fire or damage).

🔍 Homeowner tip: Some companies even offer video camera inspections so you can see the damage or buildup for yourself.

If you’re in an area like West Hollywood, here’s a reputable team offering expert chimney inspections and cleanings to help get things started.


The Cleaning Process: Step-by-Step Breakdown

Once the chimney sweep has determined the situation, they’ll get to work. Here’s what happens during a standard chimney cleaning service:

  1. Setup and Protection
    • Drop cloths or tarps protect your home’s interior
    • Industrial vacuum with HEPA filters prevents dust spread
    • Tools are organized, and technician safety gear is worn
  2. Flue Cleaning
    • Specialized brushes on flexible rods scrub the inside walls of your chimney flue
    • Loose soot and creosote are vacuumed up
    • If the buildup is extreme, chemical cleaners or rotary tools may be used
  3. Smoke Chamber and Firebox Cleaning
    • The smoke chamber above your firebox is cleared of soot layers
    • The firebox itself is vacuumed, scrubbed, and inspected for cracks or damage
  4. Chimney Cap, Damper, and Exterior Check
    • Chimney caps are cleaned and examined
    • Dampers are tested to ensure smooth operation
    • Exterior masonry is visually inspected for signs of spalling, cracks, or water penetration

Tools of the Trade (And Why They Matter)

Modern chimney sweeps use far more than a soot-covered brush. Here’s what they typically bring to the job:

Tool/EquipmentPurpose
Wire Brush RodsScrubs creosote from flue
HEPA VacuumPrevents soot spread indoors
Inspection Mirror or CameraReveals hidden damage or buildup
Drop ClothsProtects flooring and furniture
FlashlightInspects hidden corners
Respirator/GogglesTechnician protection from fine particles

This equipment ensures not only a cleaner chimney but also a cleaner home during the process.

🎯 Pro Tip: Ask your sweep to explain what they found afterward. Good technicians will walk you through their findings so you can understand your chimney’s health better.


Section 2: Beyond the Sweep — Common Add-Ons and Long-Term Benefits

While the primary goal is to clean the chimney, many companies offer additional services that improve safety, durability, and performance.

Additional Maintenance Services Often Included (or Offered)

During your service, your technician might recommend or perform one of the following:

  • Chimney Cap Installation or Replacement: Keeps rain, animals, and debris out
  • Crown Repair: Fixes cracks on top of the chimney
  • Masonry Tuckpointing: Replaces crumbling mortar joints
  • Chimney Relining: Installs a new liner if the old one is damaged
  • Waterproofing: Adds a protective sealant to prevent water damage
  • Smoke Draft Testing: Ensures smoke is ventilating properly

🏠 A couple in Northern California thought their damper was broken due to poor airflow. Turns out, birds had nested in their chimney! A thorough inspection and a cap installation fixed it for good.

Long-Term Benefits of Regular Cleaning

Getting a chimney cleaning service isn’t just a short-term fix. It protects your home for years to come.

Here’s what you gain long-term:

  • Fire safety: Less creosote = lower fire risk
  • Efficiency: Fires burn hotter and cleaner
  • Indoor air quality: Less smoke and odor
  • Prolonged lifespan: Chimney components stay functional longer
  • Cost savings: Catching small issues before they become big repairs

Here’s a quick comparison table of chimney maintenance vs. the cost of skipping it:

Maintenance TaskCost RangeCost of Neglect
Annual Cleaning\$100–\$250Chimney Fire Repairs (\$10,000+)
Cap Replacement\$75–\$250Water Damage/Mold (\$5,000+)
Flue Relining\$1,500–\$4,000CO2 Poisoning Risk, Fire Risk
Brick Repair\$500–\$2,000Full Rebuild (\$10,000+)

How Often Should You Schedule a Cleaning?

The Chimney Safety Institute of America (CSIA) recommends an annual inspection and cleaning if needed — especially for wood-burning fireplaces.

Here’s a simple guide to help:

Usage TypeRecommended Cleaning Frequency
Wood-burning fireplaceOnce per year (or after 1 cord of wood)
Gas fireplaceEvery 1–2 years
Rarely used fireplaceEvery 2–3 years, minimum
After a storm/fireImmediately

Section 3: Choosing the Right Chimney Cleaning Service — and What to Look For

The success of your chimney maintenance depends not just on what’s done, but who does it. Choosing the right company makes all the difference.

What to Look for in a Chimney Cleaning Provider

  • Certifications: Look for CSIA, NFI, or other industry credentials
  • Transparency: Are they clear about pricing, services, and optional upgrades?
  • Reviews and Reputation: Yelp, Google, and local forums can reveal a lot
  • Documentation: Do they provide before-and-after photos or a written report?
  • Insurance and Licenses: Are they legally covered and trained?

🧱 Tip: Avoid “chimney sweep scams” that offer ultra-low prices and pressure you into expensive repairs. Stick to trusted pros with real credentials.

If you’re unsure where to start, this highly-rated California-based team is known for their transparency, safety-first mindset, and excellent customer service.


Questions to Ask Before Booking

Here are a few smart questions to ask a chimney sweep before scheduling service:

  • “Are you CSIA certified?”
  • “What’s included in your standard service?”
  • “Do you offer photo/video documentation?”
  • “Do you clean the smoke chamber and firebox too?”
  • “Can you check my chimney cap and flashing?”
  • “Is the price fixed or subject to change on-site?”

Final Thoughts: A Clean Chimney is a Safer Home

Your fireplace is meant to bring warmth, not risk. A thorough chimney cleaning service ensures that every crack, crevice, and component is working exactly as it should.

Remember:

  • Schedule inspections annually
  • Book cleanings before heavy usage seasons
  • Choose a certified professional
  • Don’t ignore the little signs like smoky air or strange odors

Taking action today could prevent a disaster tomorrow.

So, next time you sit by a cozy fire, you can relax fully — knowing your chimney has been cleaned, checked, and cared for by the right hands.


Want to schedule your next cleaning with a team that combines expertise with top-tier customer care? Click here to connect with local chimney specialists across California.

Discover how we can elevate your digital presence.

🔥 Frequently Asked Questions (FAQs)

How do I know if my chimney needs to be cleaned?

If you notice strong odors, poor airflow, or smoke backing into your room when using the fireplace, your chimney likely needs cleaning. Also, if it’s been over a year since your last inspection or you’ve burned a cord of wood, it’s time to schedule a chimney cleaning service.

What exactly is included in a chimney cleaning service?

A typical chimney cleaning service includes an inspection, flue brushing, soot and creosote removal, smoke chamber and firebox cleaning, and a check of your chimney cap, damper, and exterior masonry. Many providers also offer optional services like chimney cap installation, waterproofing, or masonry repair if needed.

How long does a chimney cleaning appointment take?

Most appointments take between 1 to 2 hours. This depends on your chimney’s size, condition, and whether additional services are needed, like removing heavy creosote buildup or repairing minor damage.

How much does it cost to have my chimney cleaned?

On average, chimney cleaning services cost between $100–$250. If your chimney requires a video inspection, deep cleaning, or repairs, the price may go up. Always ask for a clear quote before work begins.

How often should we have our chimney cleaned or inspected?

The Chimney Safety Institute of America recommends a professional inspection once a year. If you use your fireplace regularly, it’s smart to schedule a full cleaning annually, especially before heavy winter use.

Why Air Conditioning Maintenance Is More Than Just a Chore

The Invisible Danger in the Air

It might seem like your Air Conditioning unit is doing its job just fine. But what if it’s quietly circulating polluted air throughout your space? When left uncleaned, these systems can harbor mold, bacteria, and dust. Every time you turn it on, you risk spreading contaminants into your environment, potentially compromising the health of everyone around you.

A neglected unit is not only inefficient but can also be a silent contributor to chronic illness, asthma, and respiratory infections. Regular Air Conditioning maintenance is not a luxury—it’s a necessity.

Health First: Protect Your Family, Friends, and Workplace

At Voltora Industries, we prioritize your health. A dirty air conditioner poses risks such as:

  • Chronic cough and respiratory problems
  • Allergic reactions due to mold spores
  • Triggered asthma attacks
  • Increased risk of viral and bacterial infections

Why Air Conditioning Maintenance Deserves Your Attention

Enhanced Efficiency and Lifespan

When filters and internal parts are clogged with dirt, your Air Conditioning system struggles to function. Cleaning reduces this stress, allowing it to operate smoothly. Regular upkeep prolongs your system’s life and ensures it continues to cool efficiently.

Lower Energy Bills

A clean unit consumes less energy. A dirty Air Conditioning system must work harder, using up to 25% more electricity. That translates to higher utility bills and more strain on your wallet. Investing in maintenance is the smart, budget-conscious move.

Avoid Future Repair Nightmares

Unchecked dirt build-up leads to wear and tear. Overheating coils and damaged components can cause your entire unit to fail. Regular AC Cleaning catches small issues before they turn into costly disasters.

Cleaner Air, Healthier Home

Your Air Conditioning system doesn’t just control temperature—it filters the air you breathe. But when neglected, it becomes a breeding ground for microbes. Ensuring it stays clean helps maintain fresh, breathable air inside your home or office.

The Benefits of Clean Air Conditioning at a Glance:

  • Reduces allergens in the air
  • Helps prevent indoor mold growth
  • Removes unpleasant odors
  • Promotes better sleep and focus

DIY vs Professional Maintenance: What You Can Do

While some maintenance tasks are simple, others require professional expertise. Here’s a breakdown:

Homeowner Maintenance Tips

  • Check and clean filters monthly during heavy use
  • Keep the area around the outdoor unit clear of debris
  • Run the fan mode occasionally to dry out internal moisture

Tasks for Air Conditioning Professionals

  • Deep coil and fin cleaning
  • Refrigerant level checks
  • Duct inspection and cleaning
  • Motor lubrication and electrical component testing

How Often Should You Service Your Air Conditioning Unit?

It depends on usage, but here are general guidelines:

  • Heavy Use (Summer/Hot Climates): Monthly filter checks
  • Moderate Use: Every 2-3 months
  • Professional Maintenance: At least once every 12 months

A professional inspection ensures all parts of your Air Conditioning system are functioning optimally. This includes hard-to-reach internal components and early detection of wear.

The Voltora Industries Promise

We don’t just service your Air Conditioning unit. We ensure your entire environment is safer and healthier. Brisbane residents trust Voltora for:

  • Comprehensive cleaning services
  • Expert diagnostics
  • Friendly and certified technicians
  • Honest, upfront pricing

Reasons to Choose Regular Air Conditioning Maintenance

  • Boosts indoor air quality
  • Saves money on electricity
  • Extends the lifespan of your unit
  • Protects your family from airborne illnesses
  • Ensures consistent cooling comfort

Description List: Key Terms

Evaporator Coil A vital part of the indoor unit that absorbs heat from indoor air

Refrigerant The substance responsible for cooling the air inside your system

Filter Captures dust, pollen, and airborne particles before the air is circulated

Fan Mode An AC setting that circulates air without cooling, helping to dry out the system

Frequently Asked Questions (FAQ)

How do I know if my Air Conditioning unit needs cleaning? If your unit smells musty, blows weak air, or triggers allergies, it’s time for a cleaning.

Can I clean my Air Conditioning system myself? You can clean or replace filters and clear debris from the exterior, but deeper cleaning should be left to professionals.

How long does a professional maintenance service take? Typically, 1 to 2 hours depending on the size and condition of your system.

Will maintenance void my warranty? On the contrary, most manufacturers require regular maintenance to keep warranties valid.

Is professional maintenance expensive? Compared to the cost of repairs or replacement, regular service is a smart investment.


Air Conditioning is essential for comfort, but its maintenance is crucial for health, efficiency, savings, and visibility. Schedule your next cleaning and experience the difference a clean system makes.

Harmony in Interior Design

The 70/30 Principle: Unlocking Effortless Harmony in Interior Design

Creating a space that seamlessly blends beauty and function requires more than just a good eye for color or stylish furniture. A room that feels naturally cohesive often follows a timeless strategy: the 70/30 rule. This approach ensures that 70% of the room maintains a consistent design theme, while the remaining 30% introduces contrast, personality, and flair. Whether you’re dreaming of a sleek modern retreat or a cozy hideaway, understanding this balance can completely transform your interiors.

Why the 70/30 Rule Elevates Your Space

Professional interior design experts champion the 70/30 rule for one reason: it works flawlessly. Here’s why this method is essential:

  • Establishes visual consistency – The dominant 70% grounds the design with a unified theme.
  • Injects character – The 30% contrast allows room for creativity and self-expression.
  • Improves flow – Balanced spaces guide the eye effortlessly and feel intuitively arranged.
  • Reduces visual clutter – Prevents overwhelming contrasts while keeping things fresh and interesting.

Now, let’s explore how to apply this golden principle to achieve stunning interior design balance.

Mastering the 70/30 Rule: Practical Tips

1. Define Your Style Split

Start by selecting a primary design style to dominate the space, complemented by a secondary style that adds variety and intrigue.

Inspiring Combinations

  • Modern (70%) + Vintage (30%) – Picture clean-lined furniture accented by unique antique finds.
  • Minimalist (70%) + Bohemian (30%) – Crisp, uncluttered backdrops with vibrant, textured accessories.
  • Rustic (70%) + Industrial (30%) – Warm woods paired with bold metal accents.

2. Craft a Balanced Color Palette

Color choices shape the mood of your space. Applying the 70/30 ratio keeps the palette structured yet flexible.

Color Breakdown

  • 70% – Dominant hues for walls, large furnishings, and floors.
  • 20% – Complementary tones for secondary furniture and textiles.
  • 10% – Bold accents via art, décor, or statement pieces.

Sample Schemes

  • Neutral Serenity: Soft beige (70%), muted sage (20%), and gold highlights (10%).
  • Dramatic Balance: Navy blue (70%), crisp white (20%), and mustard yellow pops (10%).

3. Blend Textures Thoughtfully

Texture adds depth and visual interest. Use the 70/30 principle to ensure balance without overwhelming the senses.

Effective Pairings

  • Smooth + Rough: Sleek floors offset by chunky woven rugs.
  • Matte + Glossy: Subtle matte walls contrasted with glossy tile accents.
  • Soft + Structured: Plush seating paired with metal or wood décor elements.

Applying the Rule Room by Room

The beauty of the 70/30 rule? It works everywhere—from kitchens to bedrooms.

Kitchen

  • 70%: Unified cabinets, countertops, and appliances.
  • 30%: Eye-catching pendant lights, bold bar stools, or colorful backsplashes.

Bedroom

  • 70%: Bed frame, wall color, and primary furniture.
  • 30%: Textiles, accent décor, and vibrant art.

Bathroom

  • 70%: Tiles, vanity, and fixtures in cohesive tones.
  • 30%: Towels, greenery, or decorative accents.

Whether you’re working with an interior design firm or styling your space yourself, this approach simplifies decision-making while maximizing visual impact.

Avoid These Common Mistakes

Even a foolproof rule has pitfalls if misapplied:

  • Overpowering contrasts – Keep your 30% accents impactful but subtle.
  • Undefined dominant style – Choose your core theme before adding layers.
  • Too many competing elements – Stick to a single contrasting style.
  • Ignoring scale – Ensure furniture and décor are proportionate.

Designing with Purpose

By embracing the 70/30 principle, you can create spaces that feel both cohesive and captivating. This versatile strategy helps avoid design overwhelm while offering plenty of room for creativity.

If you’re ready to bring this balance to life, consider working with experienced las vegas designers or a certified interior design firm who can guide you through the process and make your vision a reality.

Maximizing online engagement is key for interior design professionals aiming to grow their client base and reputation.

FAQs: Your 70/30 Rule Questions Answered

Q1: Can I mix more than two styles? 

Yes, but let one style dominate 70% and combine others within the 30% to maintain harmony.

Q2: How do I make my contrasts cohesive? 

Use a unifying element—such as color, material, or theme—for all 30% accents.

Q3: Does this work for small spaces? 

Absolutely! It helps avoid visual clutter and keeps compact rooms balanced.

Q4: Can I apply the 70/30 rule to furniture layouts? 

Yes! Use consistent materials or colors for most furniture and introduce standout pieces strategically.

Q5: What’s the easiest starting point? 

Begin with a color palette, establishing your dominant hue first.

Interior Designer Cost in 2025

What Does an Interior Designer Cost in 2025? Your Complete Pricing Guide

Transforming your living space with the expertise of a certified interior designer can dramatically enhance both aesthetics and functionality. But before you embark on a design journey, one pressing question remains—what will it cost in 2025 to hire an interior designer?

While prices vary depending on experience, location, and the level of customization, this guide breaks down the most common pricing models, potential hidden fees, and key factors influencing your investment.

Interior designers offer flexible pricing structures tailored to project size and complexity. Here are the most common ways they charge:

1. Flat or Fixed Fee

Many professionals opt for a flat rate covering the entire project. For 2025, expect fees to range between \$2,000 and \$10,000 per room.

Advantages:

  • Transparent, upfront costs
  • Ideal for complete room transformations
  • Eliminates surprise expenses

Drawbacks:

  • May not suit smaller projects
  • Higher initial payment

2. Hourly Rates

For consultations or smaller design tasks, many interior design experts bill by the hour. Rates typically fall between \$100 and \$500.

Rate Breakdown by Experience:

  • Entry-Level Designer: \$50 – \$150/hour
  • Mid-Tier Designer: \$150 – \$300/hour
  • Elite Designer: \$300 – \$500/hour

3. Per Square Foot Pricing

For expansive spaces or commercial projects, pricing per square foot is common, generally \$5 to \$15 per sq. ft.

Sample Costs:

Room SizeEstimated Cost
500 sq. ft.\$2,500 – \$7,500
1,000 sq. ft.\$5,000 – \$15,000
2,000 sq. ft.\$10,000 – \$30,000

4. Percentage of Total Budget

Designers may charge 10% to 40% of your total project cost. For a \$50,000 renovation, that equates to \$5,000 to \$20,000.

Best for:

  • Major remodels
  • Clients preferring scalable fees

What Factors Influence Interior Designer Costs?

Several key variables shape your final price:

Experience & Reputation

Veteran designers command premium rates thanks to their portfolio, expertise, and vendor access.

Typical Hourly Rates:

  • Entry-Level: \$50 – \$150
  • Mid-Tier: \$150 – \$300
  • High-End: \$300 – \$500

Geographic Location

Rates fluctuate by city:

CityAverage Hourly Rate
New York\$250 – \$500
Los Angeles\$200 – \$450
Chicago\$150 – \$400
Houston\$100 – \$300
Rural Areas\$50 – \$150

Customization & Materials

Expect higher costs for custom furnishings, luxury finishes, and premium decor.

Material Estimates:

  • Standard: \$5,000 – \$10,000
  • Mid-Range: \$10,000 – \$30,000
  • Luxury: \$30,000+

Additional Costs to Budget For

Beyond base fees, watch for these potential expenses:

  • Consultation Fees: \$150 – \$500
  • Procurement Fees: 10% to 40% commission on purchases
  • Project Management Fees: For overseeing contractors and logistics

Is Hiring an Interior Designer Worth It?

Absolutely—if your goal is a polished, functional space. Benefits include:

✅ Saves time and avoids costly mistakes ✅ Access to exclusive vendor discounts ✅ Cohesive, personalized design ✅ Potential increase in property value

However, if you only seek minor decor changes or love DIY projects, professional services might not be necessary. To explore expert design services, connect with a trusted interior design firm or consult with seasoned interior design experts to bring your vision to life.

FAQs About Interior Designer Pricing

What’s the most affordable way to hire an interior designer?

Consider virtual design services (starting around \$300/room) or hire a junior designer. Alternatively, a one-time consultation can offer expert advice for DIY projects.

Can I negotiate fees?

Yes—especially for long-term projects or if you’re sourcing some materials yourself.

Do designers offer free consultations?

Most charge an initial fee, but some may provide a free discovery call.

What’s the difference between interior designers and decorators?

Interior designers handle structural planning and renovations, while decorators focus solely on visual aesthetics.

How can I save on design costs?

Shop furniture sales
Mix high-end with budget pieces
Use room-planning apps before making purchases

Final Thoughts

Investing in a las vegas designer or interior design firm can dramatically improve your home’s look, function, and market value. Whether you prefer a fixed fee, hourly rate, or square foot pricing, understanding the various cost models and potential add-ons helps you budget wisely. An effective digital strategy is essential for interior designers looking to increase bookings and build lasting client relationships.

Keep the Hearth Healthy: Your Complete Guide to Wood Fireplace Maintenance

Why Wood Fireplace Maintenance Should Never Be Ignored

A cozy wood-burning fireplace can transform your home into a warm and inviting retreat. But like any home appliance, it requires regular care. Ignoring wood fireplace maintenance doesn’t just reduce efficiency—it creates serious safety hazards. From chimney fires to indoor smoke pollution, the consequences of neglect are real. That’s why wood fireplace maintenance is more than a chore—it’s a homeowner’s responsibility.

When and How Often Should You Clean Your Fireplace and Chimney?

Experts in wood fireplace maintenance recommend a thorough cleaning at least once per year. The best time? Right after the cold season ends, in spring or early summer. This ensures any soot, debris, or creosote buildup doesn’t sit in your chimney all year long.

Signs It’s Time for a Cleaning

  • A strong, smoky odor even when the fireplace isn’t in use
  • Soot or debris falling into the firebox
  • Poor draft or smoke backing up into the room
  • A visible layer of creosote more than 1/8 inch thick

Don’t wait until these signs become obvious. Routine wood fireplace maintenance prevents costly repairs and keeps your system running smoothly.

DIY Wood Fireplace Maintenance: Step-by-Step Basics

While calling in a professional is the safest bet, many homeowners tackle basic fireplace upkeep themselves. If you’re confident and cautious, here are the fundamentals of DIY wood fireplace maintenance.

Essential Tools You’ll Need

  • Chimney brush (sized for your flue)
  • Extension rods
  • Drop cloths
  • Dust mask and safety goggles
  • Flashlight or headlamp
  • Vacuum (preferably a shop vac)

Basic Cleaning Process

  1. Lay drop cloths to protect the surrounding area
  2. Inspect the chimney with a flashlight
  3. Seal the fireplace to keep dust and soot contained
  4. From the roof, insert the brush and begin scrubbing in up-and-down motions
  5. Clean up any debris that falls into the firebox
  6. Vacuum and wipe down the surrounding area

Benefits of Hiring a Chimney Sweep Professional

Professional chimney sweeps bring experience, tools, and trained eyes to spot problems you may miss. Certified sweeps follow rigorous wood fireplace maintenance protocols to ensure every aspect of your system is safe.

Why Call in the Pros?

  • Lack of proper equipment
  • Fear of heights or rooftop work
  • Complex chimney structures
  • Signs of damage like cracks or leaks

Hiring a professional guarantees not only a deep clean but also a full inspection of your flue, cap, crown, damper, and liner.

Maintenance Checklist: Keeping Your Wood Fireplace in Top Shape

To make your wood fireplace maintenance routine easier, use this go-to checklist:

  • [ ] Inspect chimney for creosote buildup
  • [ ] Clean fireplace tools and accessories
  • [ ] Examine firebox for cracks or loose bricks
  • [ ] Clear debris and ashes regularly
  • [ ] Test damper for smooth operation
  • [ ] Check chimney cap for damage or blockages

Stay ahead of problems with this easy-to-follow maintenance plan.

Common Mistakes to Avoid

Many homeowners make small errors that can lead to big problems. Here are some to steer clear of:

Top Mistakes

  • Using green or wet wood: Produces more creosote and burns inefficiently
  • Skipping annual inspections: Even if you’re not burning wood frequently
  • Ignoring chimney caps: Missing or broken caps invite pests and debris
  • Forgetting the damper: A stuck or broken damper affects airflow

Wood fireplace maintenance isn’t hard—but doing it right matters.

Benefits of Consistent Wood Fireplace Maintenance

Beyond safety, keeping up with fireplace care improves your home’s comfort and energy efficiency.

What You Gain

  • Peace of mind: Reduce the risk of chimney fires
  • Cleaner air: Fewer pollutants and less smoke inside
  • Longer lifespan: Protect the brickwork and chimney liner
  • Better performance: Easier to start fires and maintain warmth

Regular wood fireplace maintenance turns an ordinary fireplace into a dependable asset.

Frequently Asked Questions (FAQ)

How often should a wood-burning fireplace be cleaned?

At least once a year. If you use your fireplace heavily, consider cleaning it twice annually.

Can I clean the chimney myself?

Yes, if you have the proper tools and confidence. However, a professional ensures a safer, more thorough job.

What is creosote and why is it dangerous?

Creosote is a flammable substance that forms from burning wood. It can cause chimney fires if not removed.

Is it okay to burn treated or painted wood?

No. Only burn dry, seasoned firewood. Treated or painted wood releases harmful chemicals.

What’s the best time of year for chimney cleaning?

Spring or early summer, right after the heating season ends.

Final Thoughts: Make Fireplace Care a Priority

Your fireplace is a centerpiece of warmth and comfort. But that cozy charm comes with a maintenance obligation. By staying on top of your wood fireplace maintenance schedule, you keep your home safe, your air clean, and your heating efficient. Whether you’re doing it yourself or hiring a certified chimney sweep, don’t skip the care your fireplace deserves. Wood fireplace maintenance isn’t just smart—it’s essential. Interested in providing relevant information, expert advice, and actionable tips.

-