
DIY Chimney Cleaning: Is It Safe and Effective?
The Allure of DIY Chimney Cleaning: What’s Behind the Craze?
It’s a frosty evening. The fireplace is roaring, casting warm shadows across the living room walls. There’s hot cocoa on the table and fuzzy socks on your feet. Everything feels just right—until a swirl of smoke pours back into the room, turning that cozy night into a smoky mess.
That’s the moment many homeowners realize just how important chimney maintenance really is.
But then comes the second realization: chimney cleaning can be expensive. So, you hop online, watch a few tutorials, and start wondering, “Can I really clean my chimney myself?” If you’ve thought this, you’re not alone.
Why DIY Chimney Cleaning Is So Tempting
There’s something empowering about fixing things on your own. No appointments. No waiting. No invoice. Just you, your tools, and a sense of accomplishment. That’s the heart of the DIY chimney cleaning movement.
Let’s break down why so many homeowners consider this route:
- It feels more cost-effective. Paying $150–$350 a year for chimney sweeping adds up.
- Tools are widely available. Online retailers and hardware stores now stock entire DIY chimney cleaning kits.
- There’s a do-it-yourself culture boom. YouTube has made “learning by watching” more accessible than ever.
- It gives homeowners control. With everyone juggling busy schedules, being able to handle the task at one’s own pace is appealing.
Still, DIY isn’t always the shortcut it seems to be.
The Hidden Complexity of Chimney Systems
Most people picture their chimney as a simple brick tube. In reality, modern chimneys have multiple components:
- Flue liner (metal or clay): directs smoke and gases safely upward.
- Smoke chamber: funnels smoke into the flue.
- Damper: opens and closes to control airflow.
- Crown and cap: keep out rain, animals, and debris.
If any of these elements are damaged or blocked, it can lead to poor draft, smoke backups, and worst-case scenario—chimney fires. Creosote, a tar-like substance created when wood burns, is particularly dangerous. It sticks to the walls of the flue and builds up over time.
Creosote has three stages:
| Stage | Texture | Danger Level | DIY Removable? |
| 1 | Flaky or dusty | Low | Yes |
| 2 | Crunchy & tar-like | Medium | Sometimes |
| 3 | Glazed, hard, glossy | High | No (needs pro) |
Many homeowners unknowingly leave behind stage 2 or 3 creosote, increasing fire risk significantly.
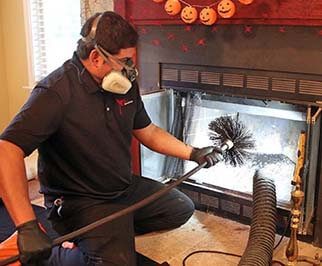
Getting Your Hands Dirty: What DIY Chimney Cleaning Involves
So, you’ve decided to give DIY chimney cleaning a go. You’ve watched a couple of videos and feel fairly confident. But before you jump on the roof, let’s walk through what this really involves—and whether it’s something you’re truly ready for.
Step-by-Step DIY Chimney Cleaning Process
This process isn’t a one-size-fits-all solution, but here’s a comprehensive outline of how most DIY cleanings go:
Step 1: Safety Comes First
- Put on safety goggles, thick gloves, and a dust mask or respirator.
- Ensure your ladder is stable. Roof work is dangerous, especially on wet or icy days.
- If possible, have someone spot you from the ground.
Step 2: Prepare Your Home
- Use drop cloths or old blankets to cover flooring and furniture.
- Close nearby doors to keep soot from spreading.
- Turn off fans, HVAC, and pilot lights before beginning.
Step 3: Inspect Your Chimney
Use a flashlight or camera on a rod to examine the interior for:
- Creosote buildup
- Soot
- Animal nests
- Broken bricks or flue tiles
- Moisture or rust stains
Step 4: Choose Your Cleaning Method
There are two main approaches:
- Top-down cleaning: Requires accessing the chimney from the roof and working your brush downward.
- Bottom-up cleaning: Lets you clean from inside the home but can be messier.
Both require:
- Chimney brush (correct size for your flue)
- Rod extensions (to reach entire flue length)
- A vacuum (HEPA preferred) to manage soot fallout
Step 5: Start Scrubbing
Push and pull the brush several times, working your way through the length of the chimney. The goal is to dislodge as much creosote and soot as possible. Expect black flakes, dust clouds, and a good upper-body workout.
Step 6: Clean the Firebox and Damper
Once the chimney interior is brushed, sweep or vacuum the soot from your fireplace’s base. Don’t forget to check and clean the damper—it often collects creosote too.
Step 7: Re-inspect and Dispose
Use your flashlight again to verify your work. Bag the debris in heavy-duty trash bags and dispose of it safely, following local regulations.
Tools of the Trade: DIY vs. Professional Equipment
| Tool | DIY Option Available? | Pro-Level Advantage |
| Chimney Brush | ✅ Yes | Industrial strength and custom-fitted to chimney |
| Extension Rods | ✅ Yes | Flexible, longer reach |
| Drop Cloths | ✅ Yes | Fire-rated protection |
| Vacuum (HEPA preferred) | ✅ Shop vac usable | Dustless commercial suction systems |
| Camera Inspection Gear | ❌ Not typical | Detects cracks, leaks, damage in hard-to-see areas |
Pros use advanced gear because they’re not just cleaning—they’re inspecting your chimney’s health.
DIY Pitfalls to Avoid
- Wrong brush size: Too small = ineffective. Too big = liner damage.
- Skipping inspections: Just because it’s clean doesn’t mean it’s safe.
- Ignoring odors: A burnt or musty smell may indicate hidden creosote or moisture damage.
- Animal nests: Raccoons and birds often nest in chimneys. DIYers risk bites, diseases, or worse.
When DIY Isn’t Enough: The Case for Professional Chimney Sweeping
Let’s be honest: some homeowners are capable of performing a decent chimney cleaning. But even with the best tools and intentions, you can’t always see or solve the underlying issues.
Real-World Story: The Tale of Two Neighbors
- Mike, a proud DIYer, bought a chimney kit and spent his Saturday brushing away soot. Three weeks later, he noticed smoke backing up into his living room. A pro revealed a cracked flue liner that Mike had missed—and a critter nest behind his damper.
- Sandra, on the other hand, scheduled a cleaning through this trusted local provider. Not only did they remove creosote, but they also repaired minor flashing issues around the chimney crown—saving her from future water leaks.
Which story would you rather tell?
Signs It’s Time to Call in the Pros
Here’s how to know when it’s smarter to leave it to professionals:
- You notice poor drafting (smoke leaks into the room).
- You haven’t had an inspection in over a year.
- Your chimney smells—even when unused.
- You see visible staining, soot marks, or cracks.
- Your fires burn sluggishly or fail to stay lit.
If this sounds familiar, book an expert cleaning today with a team trusted in Venice.
Value of Professional Services
Professionals offer more than soot removal. They provide:
- Detailed camera inspections
- Flue cap and damper assessments
- Creosote stage evaluations
- Repair recommendations
- Code compliance checks
In essence, they’re your chimney’s doctor—spotting the illnesses before they turn into disasters.
The Hybrid Approach: Best of Both Worlds
If you’re still committed to DIY chimney cleaning, consider this compromise:
- Do a light sweep mid-season after heavy use.
- Schedule a professional inspection every year, ideally before winter.
- Keep a chimney journal noting dates of cleaning, type of wood burned, and any issues noticed.
This approach balances self-sufficiency with the reassurance of expert oversight.
Final Thoughts: Playing It Smart With Your Chimney
DIY chimney cleaning isn’t inherently bad—it can be a helpful, hands-on way to maintain your home. But it’s not a complete replacement for professional inspection and care. When safety, fire risk, and long-term home value are at stake, “good enough” isn’t good enough.
Whether you choose to grab a brush yourself or call in the experts, make sure your chimney gets the attention it deserves. Because when that next cozy fire night rolls around, the last thing you want is smoke signals telling you something’s wrong.For peace of mind, trusted service, and expert chimney care, schedule your cleaning now with Local Chimney Sweep Cleaning.
To see our portfolio and latest work, check out.
🔥 Frequently Asked Questions About DIY Chimney Cleaning
1. Can I really clean my chimney myself, or should I always hire a professional?
You can clean your chimney yourself using the right tools and safety precautions—especially for minor soot buildup. However, for creosote removal, hidden damage, or annual inspections, it’s much safer and more effective to hire a certified professional. Most experts recommend a hybrid approach: DIY touch-ups plus yearly professional service.
2. How do I know if my chimney actually needs cleaning?
You might need a cleaning if:
- Smoke backs up when using the fireplace
- There’s a strong smoky or musty odor, even when unused
- Fires burn poorly or go out quickly
- You see black soot around the fireplace opening
If it’s been over a year since your last inspection, it’s time to act—dirty chimneys are a leading cause of house fires.
3. What happens if I miss a spot or don’t clean the chimney properly?
Missed creosote buildup—especially Stage 2 or Stage 3—can cause dangerous chimney fires. It can also lead to smoke damage, carbon monoxide exposure, and reduced fireplace efficiency. Even if your chimney looks clean, unseen issues like cracks, blockages, or animal nests can go undetected without a professional eye.
4. What equipment do I need for safe and effective DIY chimney cleaning?
At minimum, you’ll need:
- A chimney brush sized to your flue
- Extension rods
- Safety goggles, gloves, and a dust mask
- A sturdy ladder (for roof access)
- Drop cloths and a vacuum (preferably HEPA)
For major creosote or hard-to-reach areas, you’ll need specialized tools that pros typically use.
5. How often should I clean my chimney if I use my fireplace regularly?
If you use your fireplace frequently during colder months, aim to clean it at least once a year. Light users can stretch that to every 1–2 years, but an annual inspection is still highly recommended. For high-use households, a mid-season DIY sweep plus a fall professional cleaning is the ideal combo.